A few years ago while prepping for a local craft show, I developed this Pokeball pattern, thinking it would be popular with kids (and kids at heart). I made a total of six for that particular show, and sold every single one of them. They've become a stock staple now, and each time I have them at a show I sell at least a few (if not all) of them.
Not only do they sell well, they're fantastic attention grabbers too! I typically display them in a large platter at the front of my table, and they've attracted numerous folks to my table. I now know the favorite Pokémon of many children, who are excited that someone 'older' gets it.
I have been meaning to write up this pattern into a more legible form for some time now, and finally have managed to do it. To give you an idea as to what the original pattern looked like, which I wrote down as I was making my first ever pokeball...
Make sense to anyone else? Or just me?? Haha!
The full pattern is available below, or you can download a free PDF copy from my Ravelry store. (While you're there, check out the other patterns I have available too!)
Pokeball Crochet Pattern
by Shaina Dyson (Made By Smree)
You will need:
- 4.5mm hook
- Worsted weight yarn (any brand)
- White
- Black
- Color of choice (IE, red)
- Yarn needle
- Small amount of poly-fil
- One button*
- Sewing needle & thread
*I typically use these buttons from Hobby Lobby (Sew-ology brand) as I love how they look, but as you can see from the photos above, any type of button will work! Don't be afraid to experiment with different styles and make your pokeballs unique!
BEGIN WITH WHITE YARN
Row one: Begin with magic ring, sc 10, join with sl st to first sc (10)
Row two: ch1, *2sc in each st, join with sl st to first sc (20)
Row three: ch1, sc around, join with sl st to first sc (20)
Row four: ch1, *sc in first st, 2sc in next, repeat from * around, join with sl st to first sc (30)
Row five & six: ch1, sc in each st around, join with sl st to first sc (30)
Row seven: ch1, *sc in next two st, 2sc in next, repeat from * around, join with sl to first sc (40)
CHANGE TO BLACK YARN
Rows eight & nine: ch1, sc around, join with sl to first sc (40)
CHANGE TO RED YARN
Row ten: ch1, sc around, join with sl to first sc (40)
Row eleven: ch1, *sc in next two st, sc2tog, repeat from * around, join with sl st to first sc (30)
Before continuing, pause here and sew on the button (Trust me on this!). I typically sew mine on rightRow one: Begin with magic ring, sc 10, join with sl st to first sc (10)
Row two: ch1, *2sc in each st, join with sl st to first sc (20)
Row three: ch1, sc around, join with sl st to first sc (20)
Row four: ch1, *sc in first st, 2sc in next, repeat from * around, join with sl st to first sc (30)
Row five & six: ch1, sc in each st around, join with sl st to first sc (30)
Row seven: ch1, *sc in next two st, 2sc in next, repeat from * around, join with sl to first sc (40)
CHANGE TO BLACK YARN
Rows eight & nine: ch1, sc around, join with sl to first sc (40)
CHANGE TO RED YARN
Row ten: ch1, sc around, join with sl to first sc (40)
Row eleven: ch1, *sc in next two st, sc2tog, repeat from * around, join with sl st to first sc (30)
where the joins are between the three colors, but you can put yours anywhere you like!
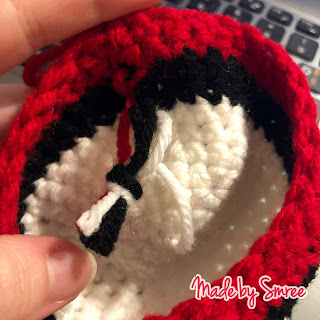
Also, as a note on the loose ends inside the pokeball – I usually just tie the ends where I changed the
colors, knot all the ends together and leave as is inside the ball. See the photo below.
colors, knot all the ends together and leave as is inside the ball. See the photo below.
You can weave them in if you like, but this is easier and has no effect on the ball's appearance!
Row twelve & thirteen: ch1, sc in each st around, join with sl st to first sc (30)
Row fourteen: ch1, *sc in first st, sc2tog, repeat from * around, join with sl st to first sc (20)
Row fifteen: ch1, sc around, join with sl st to first sc (20)
Row sixteen: ch1, sc2tog, repeat around, join with sl st to first sc (10)
Stuff with poly-fil until ball reaches desired squishy-ness. :)
Row seventeen: ch1, sc2tog, repeat around, join with sl st to first sc (5)
FO, leaving a longer length of yarn, and use yarn needle to sew top of ball closed, weave in end.
Go out and catch them all!
Follow MadeBySmree using the links below, and be sure to tag me in your finished photos!


Comments
Post a Comment